
Homemade recycled paper for my new help the butterflies and bees labels!
- Apr 24, 2018
- 3 min read
Exciting times everyone, as all the old paper I got from the old office shreds gets turned into fab labels that have been impregnated with wild flower seeds, so that you can plant them in the ground when your done with them, and wild flowers will grow for the butterflies and bees! See what I've done there...Butterflybees!
So here is the paper making process...
What you need:
Box frames
Shredded paper
Wire mesh
Food processor (you might want to pick up a second hand one and just use it for this)
Wire cutters for wire if it isn't cut to size
Gloves
Glue
Mask for glue fumes
Water proof paint or varnish
Sponge
Felt or absorbent cloth
Natural dye clay, spices, beetroot powder, tea, coffee etc..
Botanicals if you want to add texture
Water
Square plastic or sink bigger than the frame
Heavy books and towels (or one of those fancy paper pressing machines that make life so much easier that is slightly out of my reach at this time).
Iron
Step one:
Buy some box frames from the range, I love the range it has such a diverse 'range' of products for a very good price, maybe get some from a car boot sale. Take the backing off and measure the inside area for your mesh.


Step two:
Buy some fine mesh wire. I got mine through from ebay but the size was smaller than they had quoted, and it was too flimsy for the job. So I had to improvise, luckily I'm quite good at improvising. That meant cycling along to B&Q to get the only one they had, which was not only too big in size but so were the holes. And Goldilocks thinks she had problems! However where there is a will there is a way! Cut the improvised bit of mesh to size with some wire cutter, wear gloves as it can get really sharp and we don't want any accidents do we. Glue it into place then pop on the back and secure it.


Step three:
Paint it with the waterproof paint add the finer mesh if you are improvising like me. If not just get the finer holed but sturdier mesh in the fist place, which should make life slightly easier. The universe just likes to challenge me. *cough*


Step four:
Shred paper. Put in food processor. Add double the amount of water to paper. Add dye (mine was green tea, and clay, think barley grass would have made it more vibrant, beetroot powder is another good one). Whizz! Add botanicals. Stir.


Step five:
Pour mixture into a basin or sink filled with water. Take your frame and put it under the water, Give it a shoogle (love that Scottish word) until it is filled with the mix. If you want a thicker card like paper for bookmarks, scrapbooks etc..Just put the mix straight into the frame and flatten it out with a spatula.


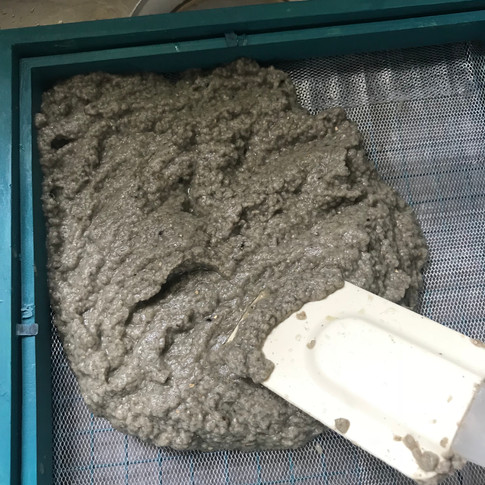
Step six:
Put your felt or absorbent cloth on top of the mix in the frame and keep dabbing your sponge on it and squeezing the sponge out to remove a lot of the liquid.


Step seven:
Push it out of the frame onto a towel. Put another towel on top and add your heavy books. Leave for a day or so. Take books off and leave out to dry.


Step eight:
If it isn't quite as flat as you'd like. Place on towel on ironing board with a dishtowel and top and iron until fully dry.
This was the end product. They will now get cut into labels that go under my ingredients label. To plant them in the ground just take the ingredients label off and plant the wild flower one. I would prefer if it was a bit greener and slightly more variations of different shades, and texture so next time I will try adding barley grass powder instead of green tea powder or green clay and other bits and bobs too. You get the faint aroma of the green tea powder but I like to add a scent to mine with my room sprays.


Did you know you can actually make paper out of old clothing, seaweed and grass? Or why not dry your rose petals like I do and add them to the paper when it is still wet.


Comments